


Table of Contents
- Why a Low Garage Ceiling Changes the Whole Job
- DIY Jeep Hardtop Hoist for Low Ceilings: What Works
- One Person Hardtop Removal Tools Worth Owning
- Hardtop Removal Step by Step for Tight Garages
- Safety Precautions for One-Person Removal
- Storing Your Hardtop When Ceiling Space Is Tight
- Maintaining Your Hoist and Hardware
- Conclusion
- Frequently Asked Questions
Last Updated: September 16, 2026
Why a Low Garage Ceiling Changes the Whole Job
A standard seven-foot garage door opening leaves you about 80 inches of usable height, and jeep hardtop removal gets tighter when a Jeep Wrangler hardtop sits roughly 72 inches tall at the roofline. That margin sounds workable until you add a hoist mechanism, straps, and the few inches the top needs to clear the roll bar. Suddenly you are doing geometry in your driveway.
Vertical Clearance Math: The Numbers That Decide Everything
Vertical clearance math is the process of subtracting every component in your lift path from your total ceiling height to find out whether the top can actually clear the vehicle.
- Measure floor to ceiling at the lowest obstruction (often a garage door track or light fixture)
- Subtract hoist body depth plus mounting plate thickness
- Subtract hardtop height at its tallest point
- Subtract 2 inches minimum for movement
DIY Jeep Hardtop Hoist for Low Ceilings: What Works
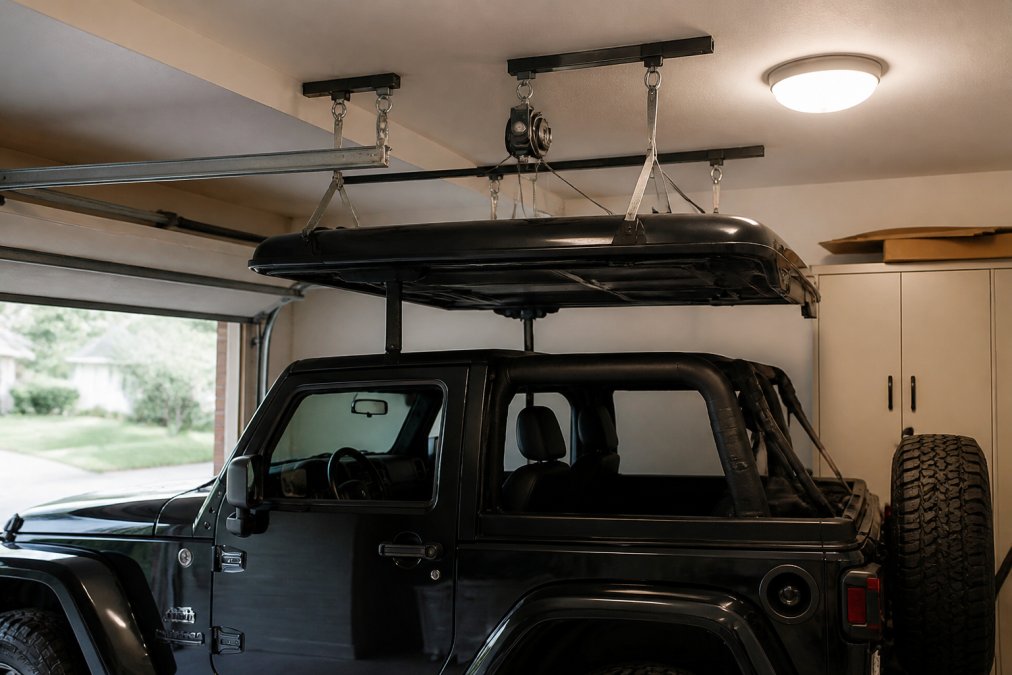
A DIY ceiling hoist works in a low garage only when the ceiling is structurally exposed and the joists run perpendicular to the vehicle. A common approach is drilling through the ceiling into 4x4 beams and mounting eye bolts directly into structural joists, which one Jeep owner documented on the r/Jeep community after modifying a drop-tile ceiling for exactly this purpose.
Drop-Tile Ceiling Workarounds
Drop-tile ceiling workarounds require abandoning the tile grid entirely and anchoring into the structural framing above it. The tile and its track are decorative, not load-bearing, and hanging any real weight from them will pull the grid down.
One Person Hardtop Removal Tools Worth Owning
One-person hardtop removal tools fall into three categories: ceiling-mounted hoists, floor-standing lift carts, and manual strap systems. Which one fits depends almost entirely on your ceiling height and whether you need the tool to travel.
| Tool Type | Ceiling Requirement | Portability | Best For |
|---|---|---|---|
| Ceiling-mounted hoist | High, exposed joists | None | Permanent high-clearance garages |
| Floor-standing lift cart | None | Limited | Low ceilings, single location |
| Manual strap system | Moderate | Minimal | Occasional use, tight budgets |
| Portable push-pedal lift | None | Full | Low ceilings, travel, solo owners |
Selecting the Right Hardware: Eye Bolts, Straps, and Pulleys
Selecting the right hardware comes down to matching every component's rated capacity to the load, then doubling your safety margin. A Wrangler hardtop is heavier than most people guess, and hardware rated for a lighter load will deform under sustained tension.

- Eye bolts: Use forged, not bent. Lag-thread eye bolts into solid wood joists only, never into drywall anchors
- Straps: Ratchet straps with a working load limit well above your top's weight; inspect for fraying before every lift
- Pulleys: Snatch blocks reduce effort but add friction points; check the cable or rope rating at each one
- Anchor points: Every mounting point should be independently load-bearing, not sharing a single joist
Hardtop Removal Step by Step for Tight Garages
Jeep hardtop removal step by step in a tight garage follows the same sequence as any other removal, with extra attention to overhead clearance at each stage. The 2026 procedure for detaching the rear section still requires opening the swing gate, lifting the rear window glass, and removing the Torx bolts at each B-pillar, as outlined by Stivers CDJR's 2026 Wrangler guide.
- Park centered in the bay and confirm your ceiling clearance with the top still installed
- Remove the front Freedom Top panels first, since they take under five minutes and free up weight
- Disconnect the rear window wiring and washer hose
- Remove the Torx bolts at both B-pillars and the rear corners
- Position your lift or hoist and attach at the balance points
- Raise slowly, checking clearance at the highest point of the arc
- Once clear, roll the vehicle forward and lower the top to its storage position
Safety Precautions for One-Person Removal
Safety precautions for one-person removal start with never standing under a suspended load. A hardtop weighs enough to cause serious injury, and a single point of failure in your hardware means it comes down without warning.
- Keep your body out from under the top at every stage of the lift
- Use a safety strap or secondary retention line in addition to your primary lift
- Never modify load-rated hardware with drilled holes or bent hooks
- Work on level ground with the parking brake set
- Have a phone within reach in case something shifts
Storing Your Hardtop When Ceiling Space Is Tight
Storing your hardtop when ceiling space is tight means using the space above the hood rather than above the roof. A floor-standing lift that parks the top directly over the front of the vehicle preserves the bay you actually need to walk through.
Maintaining Your Hoist and Hardware
Maintaining your hoist and hardware takes about ten minutes a season and prevents the failures that cause damage. Inspect before you store, not before you lift. The reason is simple: a failure you find while the top is on the vehicle is an inconvenience, and a failure you find while the top is in the air is an incident.
The Seasonal Inspection Cadence
Run a full inspection three times a year: at the start of top-off season, at the midpoint, and before you reinstall the hardtop for winter. Between full inspections, do a two-minute visual walk-around before every lift.
- Start of season: full torque check, strap inspection, anchor verification, pulley lubrication.
- Midpoint: strap and rope inspection, hook and buckle check, visual scan of every anchor.
- Before reinstall: full inspection again, plus a load test with the top lifted a few inches off the vehicle.
Pass/Fail Criteria for Each Component
Eye bolts and anchors
Venture Pro - Hardtop Removal & Storage →
- Pass: bolt is tight, does not turn under hand pressure, and shows no rust weeping at the thread.
- Fail: bolt turns freely, shows movement in the joist, or has any visible crack at the shoulder. Replace the bolt and inspect the joist for splitting.
Straps and webbing
- Pass: webbing is uniform in color, edges are intact, stitching is unbroken, and the working load limit tag is legible.
- Fail: fuzzing, glazing, stiffness, faded dye, broken stitching, or a missing load tag. Any one of these retires the strap.
Rope and cable
- Pass: no flat spots, no fraying, no kinks that will not relax.
- Fail: any flat spot, any visible core, any kink. Rope is cheap; a dropped hardtop is not.
Pulleys and snatch blocks
- Pass: sheave turns freely, groove is smooth, no side-to-side play in the axle.
- Fail: grinding, wobble, or a groove worn deep enough to pinch the rope.
Hooks, buckles, and ratchets
- Pass: spring tension is firm, latch closes fully, no deformation.
- Fail: a hook that has been bent open, a ratchet that slips under load, or a buckle that will not lock. Deformed load-rated hardware is scrap, not something to bend back.
Lubrication Without Attracting Grit
Use a dry lubricant on pulleys and pivot points. Oil and grease attract garage dust, which turns into an abrasive paste inside a sheave. A dry film lubricant keeps the sheave turning without collecting grit.
The Written Log
Keep a small notebook or a note on your phone with the date of each inspection and what you found. Two reasons: you will catch a slow change (a strap that fuzzed a little more this season than last) that a single inspection would miss, and if you ever sell the hoist or the vehicle, you have a record of how the system was maintained.
When to Retire the Whole System
A DIY hoist is not a permanent installation. If you find yourself replacing the same component twice in two seasons, or if any anchor has pulled loose from its joist, stop and re-engineer the mounting rather than patching it. The cost of a new set of rated hardware is a fraction of the cost of a hardtop, a windshield, or a trip to the emergency room.
Conclusion
The low-ceiling problem is a measurement problem, not a dead end. Run the clearance math before you buy anything, and if the numbers do not work for a ceiling mount, stop trying to force it.
Frequently Asked Questions
How much vertical clearance do you need for a hardtop hoist?
Measure your hardtop height plus the hoist mechanism and lifting path. You need enough room to raise the top above the vehicle, so add the top thickness, the hoist hardware, and a few inches of working space. If your ceiling is lower than that total, a ceiling hoist may not work. In that case, a portable floor-based tool like the TopLift Pros Venture Pro, which lifts from the ground rather than the ceiling, is a better fit.
Can one person remove a Jeep hardtop?
Yes, with the right tool. The front Freedom Top panels come off in under five minutes using the built-in latches. The rear hardtop is heavier, so a one-person removal tool such as a portable hoist or a ceiling-mounted system makes solo removal safe. TopLift Pros systems are designed for solo use and are trusted by over 50,000 owners.
What is the best tool for removing a Jeep hardtop in a low garage?
A portable hardtop removal tool that lifts from the floor, not the ceiling, is the best choice for a low garage. The TopLift Pros Venture Pro is compact, heavy-duty, and uses a 5-to-1 push-pedal system to remove and store your top in minutes. It comes semi-assembled and is designed for Jeep Wrangler and Ford Bronco owners who need a space-saving solution.
Are there alternatives to ceiling-mounted hoists for low garages?
Yes. Portable floor lifts, like the TopLift Pros Venture Pro, avoid ceiling height limits entirely. You can also use a manual lift with a low-profile design or store the hardtop on a rolling cart. Some owners use a wall-mounted rack, but that still requires lifting the top off the vehicle first. A portable tool is the most practical alternative when ceiling clearance is tight.